
Let’s talk brownies. Not just any brownies—but Peanut Butter Brownies With Peanut Butter Frosting. Fudgy, rich, chocolate-loaded brownies layered with a thick, dreamy peanut butter filling and a smooth chocolate top that sets like a ganache hug. Yeah, these are the real deal.
You might’ve heard them called Buckeye Brownies—named after those irresistible peanut butter truffles dipped in chocolate (aka buckeyes). But honestly, I just call them the brownies that disappear first at every party. These bars are layered perfection: rich cocoa base, creamy peanut butter center, and glossy chocolate topping. A triple threat for your tastebuds.
And if you’re wondering, “How To Make Peanut Butter Filled Brownies without spending hours in the kitchen?” I got you. You can go the from-scratch route (go you!) or take the shortcut and use a boxed brownie mix. Either way, you’ll end up with Delicious Brownies that might just steal the spotlight from your usual dessert lineup.
Why You’ll Be Obsessed (Like, Totally Obsessed)
These aren’t your average Peanut Butter Squares. They’re layered slabs of joy. If you’ve ever taken a bite of a Peanut Butter Filled Brownie and thought, “Wow, this is basically dessert royalty,” then you already get it.
They’re:
Fudgy AF (in the best way)
Rich, but not too rich (ok, maybe a little…)
Stacked higher than your expectations (we love a Stack Of Chocolate Peanut Butter Brownies)
Freezer-friendly (hello, midnight snack stash!)
Kid and adult approved (trust me, no one’s too old for peanut butter and chocolate)
Real Talk: To Mix or Not to Mix?
Wanna save time? Use a family-size brownie mix for the base. No shame in that game. Just make sure it fits a 9×13 inch pan—this recipe’s a big-batch beauty. Once baked, you’ll whip up that dreamy peanut butter layer and the smooth chocolate topping. Done and dusted.
Going homemade? Awesome. The brownie base comes together easily—nothing fancy, just classic ingredients and lots of cocoa love.
Pro Tip: Whether you’re using a mix or homemade batter, let the brownie layer cool completely before adding the peanut butter. Or you’ll end up with a melty mess. (Been there, done that. Learn from me.)
Flex That Pan Size
Cooking for a smaller crew? No problem. You can halve everything and bake in an 8×8 or 9×9 pan. Same baking time, less temptation staring at you from the fridge. (Unless you’re like me and call that “breakfast.”)
Storage Hacks You’ll Thank Me For
Got leftovers? Store ‘em in an airtight container in the fridge. Let them chill overnight and then set them out for 10 minutes before digging in. Soft, fudgy perfection.
Wanna stash some for later? Freeze those bars, baby! Wrap them in plastic, toss into freezer bags, and you’ve got yourself a sweet surprise waiting for future you. They’ll keep up to 4 months—if they last that long.
Fun Fact Corner
I like to call these Lucy’s Peanut Butter Brownies, not because I know a Lucy, but because if I did, she’d totally be the kind of gal who makes these for the school bake sale and becomes a legend.
And while we’re at it, let’s go ahead and crown these the Best Peanut Butter dessert of all time. Bold claim? Maybe. But after one bite, you’ll see why I stand by it.
So if you’re craving that peanut butter and chocolate duo with some serious wow factor, go ahead and whip up a batch of these bad boys. Whether you’re baking from scratch or cracking open a box, you’re in for something seriously special.
Ready to learn How To Make Peanut Butter Filled Brownies that taste like your childhood dreams but look like bakery gold? Let’s do this.
Delicious Peanut Butter Brownies aka Buckeye Brownies - The Best Peanut Butter Dessert
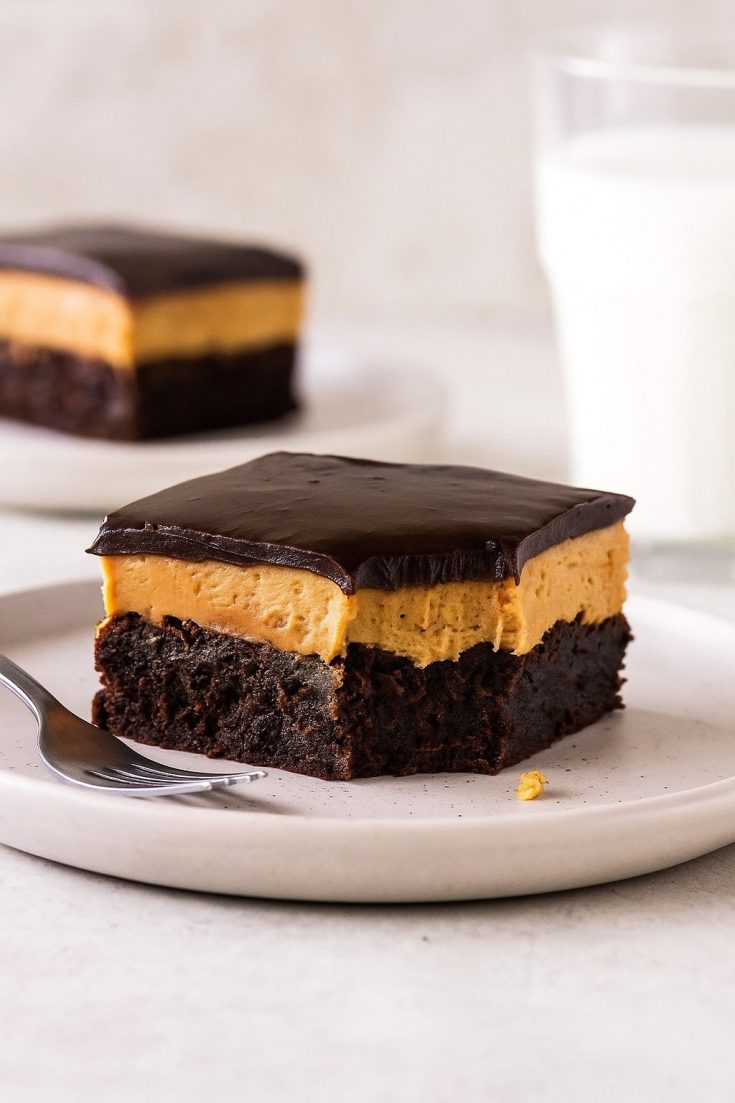
A thick, fudgy base. A creamy peanut butter center. A luscious chocolate layer on top. These bars are basically a peanut butter cup and a brownie had a beautiful dessert baby.
Ingredients
- For the Brownie Bottom:
- 1 cup unsalted butter, cut into chunks
- 8 oz semi-sweet chocolate (chopped) or 1¼ cups chocolate chips
- 2 cups granulated sugar
- 1 tsp vanilla extract
- 4 large eggs
- ½ cup cocoa powder
- ¾ cup all-purpose flour
- ½ tsp salt
- For the Peanut Butter Middle:
- ½ cup unsalted butter, softened
- 1½ cups creamy peanut butter
- 2½ to 3 cups powdered sugar (adjust for taste and texture)
- For the Chocolate Topping:
- 10 oz semi-sweet chocolate (chopped) or 1½ cups chocolate chips
- ⅓ cup heavy cream
Instructions
Step 1: Brownie Base
- Preheat your oven to 350°F. Line a 9x13 inch pan with parchment paper, leaving some extra hanging over the edges—makes removing the bars way easier.
- Toss the butter and chocolate into a large microwave-safe bowl. Heat on medium power in 45-second bursts, stirring between each round, until silky smooth. (Don’t zap it on full power or you’ll risk burning the chocolate.)
- Let it cool for a few minutes, then stir in the sugar and vanilla.
- Add eggs one at a time, whisking well after each.
- Gently stir in the cocoa, flour, and salt until just combined—don’t overmix!
- Pour into your lined pan and bake for 30–35 minutes. A toothpick poked into the center should come out clean or with just a few moist crumbs.
- Cool completely in the pan before moving on.
🔸 Step 2: That Irresistible Peanut Butter Layer
- In a large bowl, beat the softened butter until nice and fluffy.
- Add the peanut butter and beat again until smooth.
- Gradually mix in the powdered sugar. Start with 2 cups and add more until it’s thick, sweet, and holds its shape.
- Drop spoonfuls of the peanut butter filling over your cooled brownies. Then use your hands (with wax paper in between) or a spatula to press it down into an even layer.
- Pop the pan in the fridge for 30 minutes so the peanut butter can firm up.
🔸 Step 3: Chocolate Finish
- Place chocolate in a heatproof bowl.
- Heat the cream until it’s just about to boil—either in a saucepan or microwave.
- Pour the hot cream over the chocolate. Let it sit untouched for 2–3 minutes, then whisk until glossy and smooth.
(If any chocolate chunks remain, microwave for another 20–30 seconds on medium heat and stir again.) - Pour the chocolate over the peanut butter layer and gently spread it into an even coating.
- Chill again until the top is set—usually about 30–60 minutes.
Once the chocolate is firm, lift the brownies out using the parchment overhang and cut into squares or bars. Prepare for applause. 👏
Notes
- Want to skip the homemade brownie step? No prob. Use your favorite box brownie mix (just make sure it’s for a 9x13 inch pan). Bake it per the instructions and follow the rest of the recipe as is.
- These bars are rich! If you’re feeding a smaller crew, you can totally halve the ingredients and use an 8x8 or 9x9 inch pan instead.
- Storage: Keep leftovers in the fridge in an airtight container to prevent the peanut butter layer from getting too soft. Let them sit at room temp for a few minutes before eating for ultimate texture.
- You can freeze these! Wrap individual bars tightly in plastic wrap and store in a zip-top freezer bag for up to 4 months. Just thaw in the fridge overnight.

Welcome to Mariasskitchen.com! I’m Maria Tarrant, the proud owner and passionate curator of this website. As an avid lover of all things dessert, baking, and traveling, I’ve combined my passions to create a platform where I can share my culinary adventures and inspirations with you. From decadent cakes to scrumptious cookies, this website is a haven for dessert enthusiasts looking to explore the sweet side of life.
Join me on this delectable journey as I whip up mouthwatering recipes, offer baking tips and tricks, and take you along on my exciting travel escapades, discovering flavors from around the world. MariasSkitchen.com is a place where I pour my heart and soul into each post, hoping to ignite your own culinary passions and create unforgettable memories. So, grab a spoon, pack your bags, and let’s embark on this extraordinary adventure together!