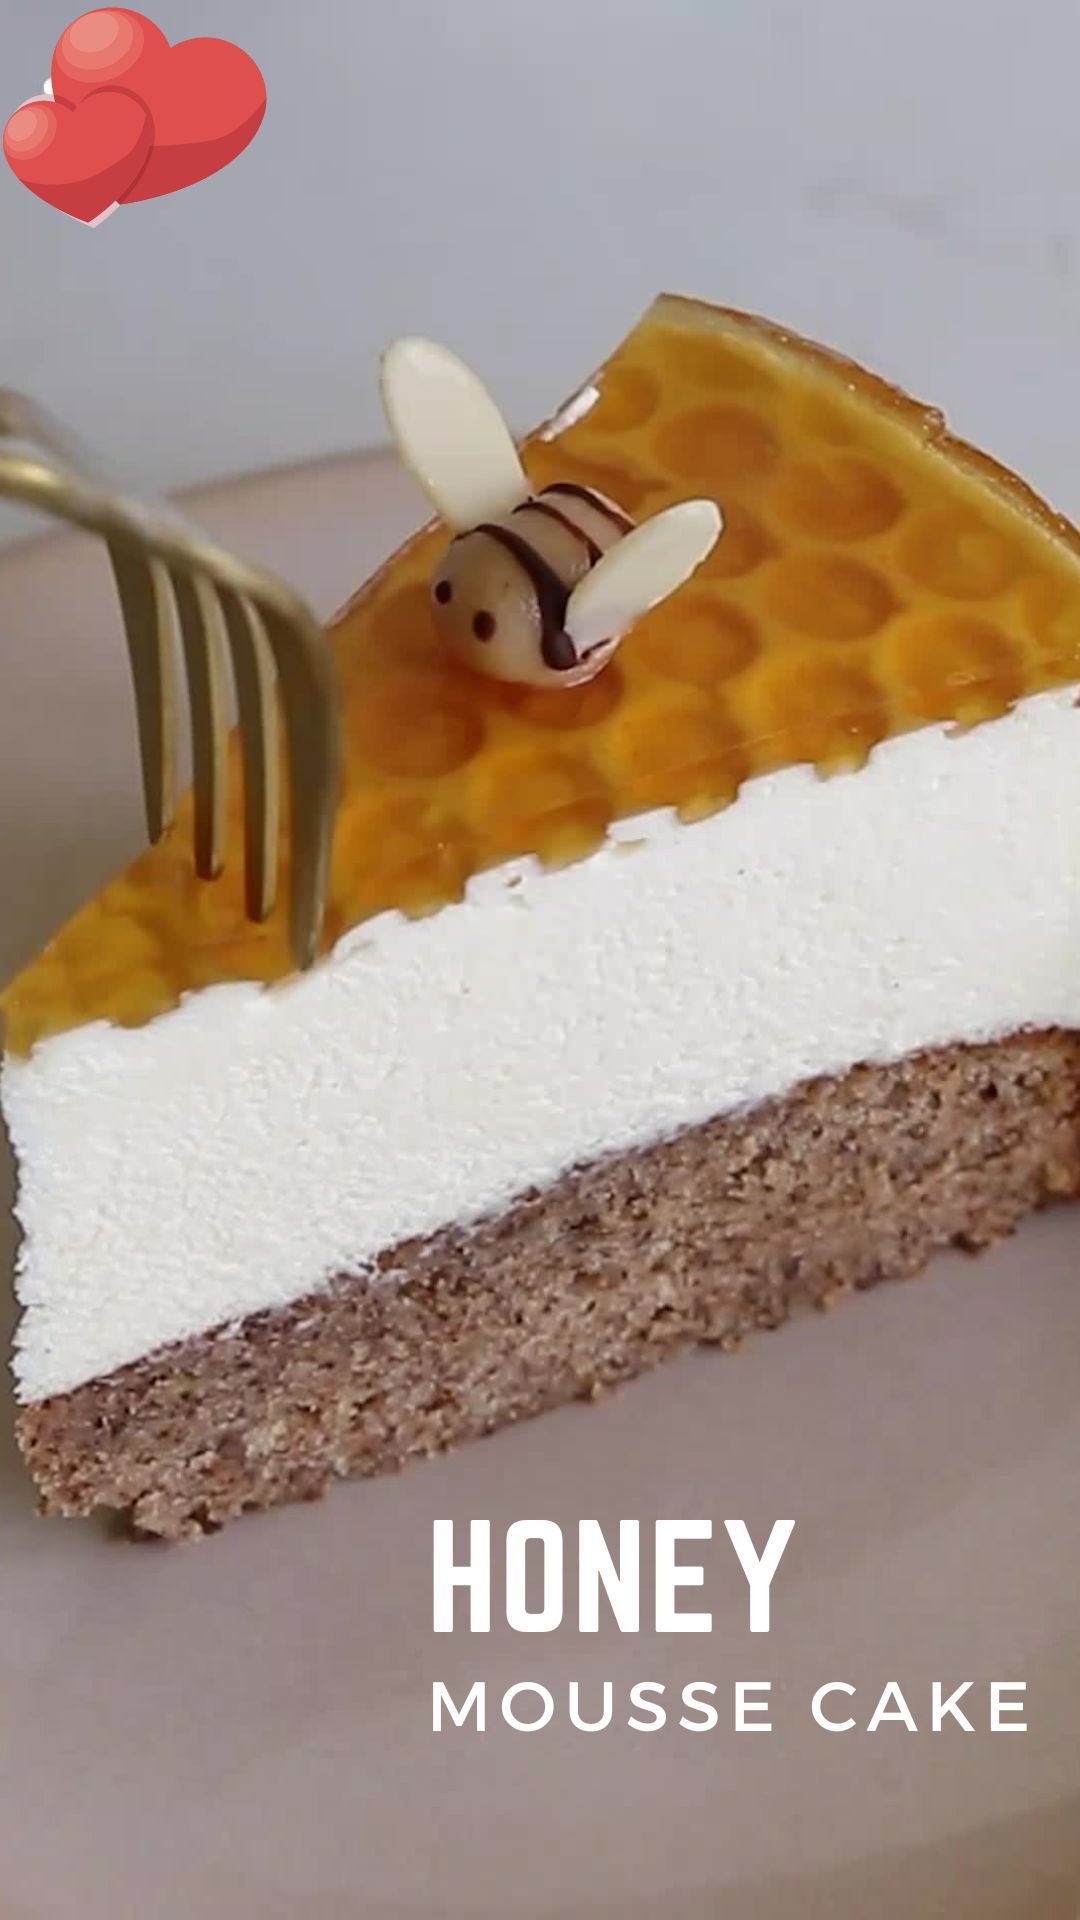
This honeycomb cake is a stunner, and even if you’re not a die-hard honey cake fan, you’ll fall head over heels for this beauty. It’s got three unique layers and two fantastic decorative elements that take this cake from gorgeous to incredible. And the best part? It’s not just a looker; it’s downright delicious.
Pecan-Honey Financier:
- 140g Butter
- 170g Powdered sugar
- 80g Flour
- 1/2 teaspoon Baking powder
- 1/2 teaspoon Cinnamon
- 1/3 teaspoon Cloves
- 120g Ground pecans
- Pinch salt
- 5 egg whites
- 40 grams Honey
Mascarpone Mousse:
- 3 teaspoons (11g) Gelatin
- 5 egg yolks
- 80g Sugar
- 40ml Water
- 40g Honey
- 2 cups (450g) Mascarpone, room temperature
- 1 teaspoon Vanilla bean paste
- 450ml Heavy cream
Honey Jelly:
- 2 teaspoons (7g) Gelatin + 40ml
- 3/4 cup (180ml) Water
- 35g Sugar
- 100g Honey
Almond-Honey Florentines:
- 50g Butter
- 40ml heavy cream
- 65g sugar
- 35g Honey
- 50g sliced almonds
- Pinch salt
For the Bees:
Marzipan 10g Melted chocolate
Instructions:
For the Pecan Honey Financier:
- First, preheat your oven to 180°C (350°F) and line a 9-inch (23cm) round baking pan with parchment paper, setting it aside for now.
- In a small pot, melt the butter over low heat. Once it’s fully melted, crank up the heat, and cook it until it turns a lovely golden-brown shade and gives off a nutty aroma. Strain it through a sieve to remove any small lumps, and let it cool.
- In a big bowl, sift together the powdered sugar, flour, baking powder, cinnamon, and cloves. Stir in the ground pecans, a pinch of salt, and mix everything well.
- In another large bowl, whip the egg whites and honey together for about a minute, just until they become lightly foamy.
- Gradually fold the dry ingredients into the whipped egg whites until just combined.
- Drizzle in the cooled brown butter, streaming it in while folding, until the batter is silky smooth.
- Pour this batter into the prepared pan and bake for around 18 minutes, or until it’s beautifully golden-brown. Let it cool completely.
For the Mascarpone Mousse:
- Make sure your bubble wrap is clean and dry, then place it on a work surface with the bubbles facing up. Place your baking pan on top, mark the diameter of the pan on the plastic, and cut it into a circle matching the size of the pan. Set this aside.
- Sprinkle gelatin over a bowl with 3-4 tablespoons of water, give it a gentle stir, and let it soak for 5-10 minutes to absorb the liquid.
- In a large bowl, start beating the egg yolks on high speed. At the same time, cook sugar, water, and honey in a small pot. Bring it to a boil and cook until you have a thick syrup that bubbles vigorously for a few seconds even after you remove it from the heat. If you have a thermometer, it should reach 118°C (244°F); if not, you can test it by dropping a bit of the syrup into a glass of cold water. It should form a soft ball.
- Pour the hot sugar syrup in a thin stream into the whipped egg yolks at low speed, and then increase the speed, whipping for about 5 minutes or until it’s light and fluffy and no longer warm to the touch.
- Dissolve the soaked gelatin in the microwave for 15 seconds, mixing until smooth. Pour this gelatin into the egg yolks while stirring lightly to incorporate.
- Add the mascarpone and vanilla bean paste to the bowl of egg yolks and whisk well until it’s smooth. Finish by folding the cream into the mixture until you get a smooth mousse.
- Line the sides of the pan or cake ring with a cake collar or parchment paper, with the financier at the bottom.
Creating the Beehive Pattern:
- Place the bubble wrap with the bubbles facing up on your work surface. Spread a few spoonfuls of mousse on it to fill all the spaces between the bubbles.
- Pour the rest of the mousse onto the cake base in the mold and smooth it out.
- Gently flip the bubble wrap over the mousse with the bubbles facing the cake, lightly press, and put the cake in the freezer for at least 5 hours or until it’s frozen solid.
- After the mousse has set, gently peel the plastic sheet from the frozen cake, and keep it in the freezer while you work on the jelly layer.
Making the Honey Jelly:
- Sprinkle the gelatin in a bowl with 2-3 tablespoons of water, mix lightly, and let it sit for 5-10 minutes to soak up the liquid.
- In a small saucepan, cook the sugar until it turns a very light caramel. Simultaneously, in a separate pan, bring the water together with the honey to a boil.
- As soon as the caramel reaches the desired color, pour the mixture of water and honey into the sugar while continuously stirring to create a honey-hued liquid.
- Remove it from heat and mix in the bloomed gelatin until it’s dissolved.
- Let the jelly cool to room temperature so it’s not hot to the touch. Slowly and gently pour the jelly over the mascarpone mousse, a little at a time, to fill all the holes with honey liquid, creating that beehive effect. Pour it slowly to avoid breaking off any bits of the honeycomb from the mousse.
For the Almond-Honey Florentines:
- Preheat your oven to 170°C (340°F) and line a baking tray with parchment paper or a silicone mat.
- In a small pot, cook the butter, heavy cream, sugar, and honey until it boils and becomes a light golden color.
- Stir in the sliced almonds and immediately spread the mixture in the pan, covering it with baking paper. Use a rolling pin to roll it out as thinly as possible.
- Carefully remove the baking paper and bake for about 7-10 minutes, or until it’s a beautiful caramel-brown color. The exact time depends on the initial cooking of the mixture, so keep an eye on it until it reaches the desired color.
- Once it’s out of the oven, let it sit for a few minutes to set, and while it’s still warm and slightly soft, cut it into squares of about 4.5 cm. Keep these squares in a single layer in a sealed container on baking paper until you’re ready to decorate.
For the Bees: Shape a small portion of marzipan into small rolls. Use melted dark chocolate to add black stripes and eyes to each roll. Stick two sliced almonds on each roll’s sides to form wings.
Decorating the Cake: Close to serving time, remove the cake from the mold. Decorate it with the marzipan bees and attach the Florentine squares around the cake as shown in the video. Serve and enjoy your impressive honeycomb cake!
Welcome to Mariasskitchen.com! I’m Maria Tarrant, the proud owner and passionate curator of this website. As an avid lover of all things dessert, baking, and traveling, I’ve combined my passions to create a platform where I can share my culinary adventures and inspirations with you. From decadent cakes to scrumptious cookies, this website is a haven for dessert enthusiasts looking to explore the sweet side of life.
Join me on this delectable journey as I whip up mouthwatering recipes, offer baking tips and tricks, and take you along on my exciting travel escapades, discovering flavors from around the world. MariasSkitchen.com is a place where I pour my heart and soul into each post, hoping to ignite your own culinary passions and create unforgettable memories. So, grab a spoon, pack your bags, and let’s embark on this extraordinary adventure together!